Introduction

Still in the continuation of my former post PowerShell-What you need to know to get started I’m going to continue to help you finding your way with PowerShell.
We all know the situation where we are in front of our blue PowerShell console painted with red everywhere…. 😦 Just because you don’t really know the command and how you need to play with to get the result you expected!!!!
The funiest moment…or maybe not(depening of what you typed) is when you type a command that worked, but the result is not what you expected. 🙂 🙂 🙂
When practicing PowerShell, the best advice I can give is: help yourself with a lab environment. That one doesn’t need to be a monster. 2VMs will be enough. If you don’t have the luck to setup your own lab environment, play with PS on a machine (can be your own first) and do only read actions in the first place…
As a last resort, you can use a cheat…!!! You will need to continue the read to know it 🙂 🙂
Read commands ?? Yeah! Remember what I said in my earlier post (check the link at the beginning of this post).
Your interactions with objects in Powershell can be split 4 main categories. Those categories can be grouped in 2 groups (Active & Passive) with their associated risks.
To get a better understanding or a better view of what I say, let’s take a look at the following table:
| Actions Categories | Group | Risk |
|---|---|---|
| Create | Active | Potential |
| Modify | Active | Potential |
| Delete | Active | High |
| Read | Passive | None* |
So based on that information, we can continue with the main topic of the post which is about commands or more specifically cmdlets that will facilitate your journey with PowerShell.
Here is the list of cmdlets that we will talk about in the next sections of the post:
- Get-Command
- Show-Command
- -whatif (parameter)
cmdlets
Get-Command
Get-command is probably one of the top command that you need to know with Powerhsell as it will reveals you all the commands known by powershell and its related modules.
Before continuing with Get-command cmdlet, I will do a very quick introduction about PowerShell modules. You will understand why very quickly! I promise!
A PS module is just an extension of the core components of PowerShell which introduce a whole set of cmdlets and functions.
For instance: let say that you want to manage an EMC storage array with PowerShell. Natively PS is not able to do it, but with its related module installed on your machine, you will be able to manage your storage array with PS. Most of the time, modules are cmdlets and functions written by 3rd party providers outside Microsoft ecosystem, to let engineers and admins manage their products with tools they are familiar (Yes, for you too! 🙂 )
Now, that you know what a PS module is, let’s continue with the cmdlet Get-command.
So, simply typing Get-command in your PS console without any parameters will return you on screen all commands available in PS and its related modules (you see! I told you it would be quick!!)
You will get someting like this:

The main problem is that it will return you thousands of cmdlets. Even if know the information you look for, it could be painfull to retreive the extact data you expect.
So my advice: Create your own cheatsheet with all your commands in it via Get-command cmdlet and keep it with you.
Copy-Paste the following command to create a csv file in your “C:\temp” with the required information
Get-Command | Select-Object -Property Name,CommandType,ModuleName,Version | ConvertTo-Csv -Delimiter ";" | Out-File -FilePath "C:\temp\pscommands.csv" -Encoding utf8For the formatting of the result, I let you deal with MS Excel or your other favorite tool for tables.
Don’t hesitate to do it reguralry based on the modules you’ve installed over time and PowerShell updates.
You’ve seen on the command that I’ve selected only 4 properties. For my own use, those ones are the most interesting, feel free to change the properties you want to see.
If you wondering which propreties you have in the panel, use the following command:
Get-Command | Get-Member -MemberType PropertiesLast but not least, regarding Get-command, if you don’t want to deal with a csv file on your side, you can always do a search based on the name of the object you want to deal with.
For instance: You need to work on a disk with Powershell but you have no idea about the available commands for disk. You can type the following command to get a better view:
Get-Command -Name *disk*This will return you all commands where “disk” is included in the name of the cmdlet.
This conclude Get-command section. hope it will help
Show-Command
show-command can be viewed as a second line of help when you didn’t find your path with the built-in help of PowerShell.
The syntax (vey simple BTW 🙂 )
Show-command followed by a space character and finally the command for which you need help
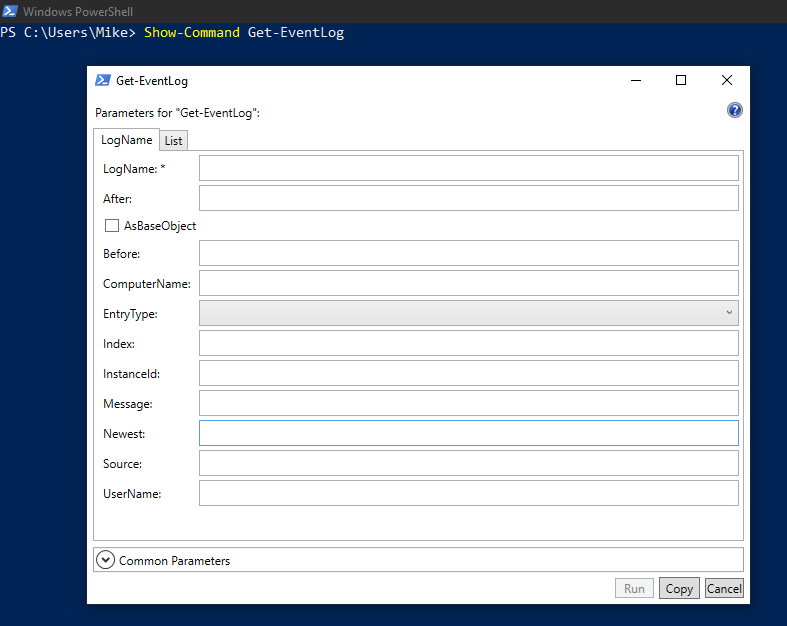
show-command Get-EventlogThis command will pop-up a window (GUI yes!!! GUI ) that will guide you throught the basic syntaxt of the command. Mainly by helping you with the parameters.
Let’s take an example:
You want to get the last 50 eventlogs from system context on your machine, but you want to see only “Error” messages. Unfortunately you don’t know how to do it with PowerShell . The help about the command didn’t help you enough.
- Type the command in your PowerShell console

2. A Pop-up appears
3. When you have a closer look at the pop-up, you can see the following. I added annotions to give more explanations.
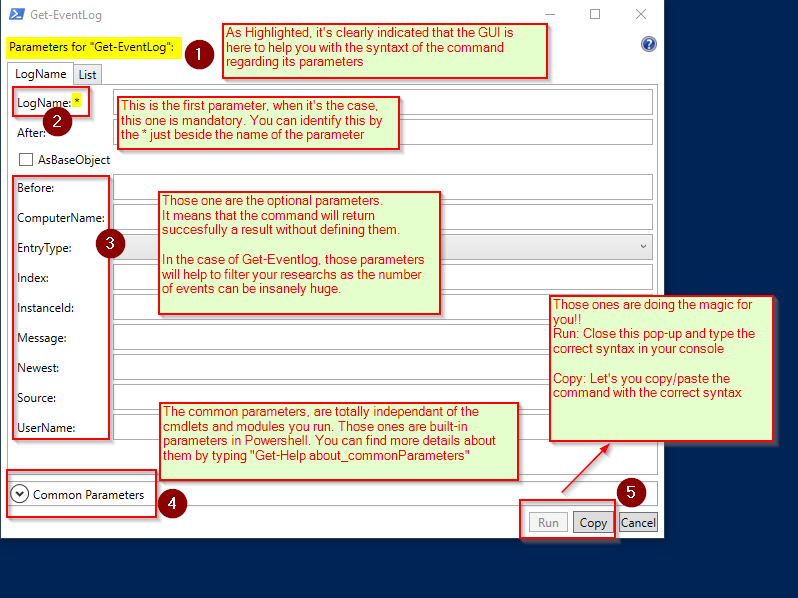
4. Fill the parameters boxes as described in the beginning of the example

5. Click on “Run” button to get the command directly typed with the correct syntax in your PS console (don’t forget to remove “^M” at the end of the command if it appears)

And Boom! the magic happens! 🙂

Which concludes the show-command topic
-whatif parameter
Bingo! Here is our cheat one! 🙂 you remember at the begining of the post?
This one is a very cool feature, especially when you don’t have any other options (lab environment) to test your command in PowerShell.
A key concept you need to know with -whatif parameter is that, it is only available for commands that will modify the objects you’re working on!
It will simulate the actions taken by the command only.
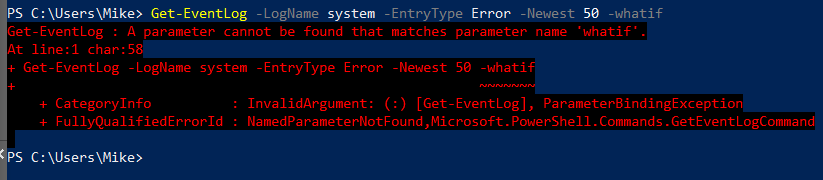
Don’t try to add -whatif parameter where the verb of the cmdlet is Get (typically read), it won’t work 😦
Here is an example on how to use it

You can see, as show in the screenshot that the -whatif parameter will simulate the action without performing it.
For your fun only 🙂
New-Alias -Name Whattime -Value Get-Date -Description "need to know when I can grab my coffee" -WhatIfLast word before finishing this post
A last parameter that is also nice to use is: -confirm parameter which is also available on commands that will modify objects in PS. This one won’t simulate, it will take action after receiving your confirmation

It means that you know what will be the result of the actions taken. It’s only a validation. This is the main difference with -whatif
Conclusion
To help yourself, run this cmdlets and parameters as frequently as you can. They will help you and they will save you time and energy.
Thanks for reading! Don’t hesitate to leave a comment or rate this post. It will help for the future posts.
Take care and stay safe!
You can always reach me here:
