Hi Guys, In today’s post nothing special 🙂 , I just wanted to share a script I wrote that will build a VM in VMware vSphere environment from a template. In this post I will detail the workflow and pieces of the code. At the end of the post, I will place a link to my GitHub repository where you will find the script. Feel free to read the code and reuse it, if you’re happy with it.
This script contains a full help section that you can invoke by typing the following line:
Get-Help .\VM-Builder-T.ps1 -ShowWindow
As a reminder for those who know my blog 😉 this help section is what we call in PowerShell a “Comment-based help”. I’ve already wrote a post about “Comment-based help” section that you can find here PowerShell Scripts: Help yourself and others. I hope you will enjoy if don’t know about it. 🙂
Ok! Intro is done :-), let’s start the fun part 😉
Context
In the VMware environment I work for, we have different teams that interact with vSphere. We have a sysadmin team that is doing regular actions on VMs without having advanced experience with vSphere. Those guys complained about the number of clicks needed to build VM without talking about the vSphere UI that comes slow time to time and so on… So I decided to write a PowerCLI script that will help them to build VM in a more straight forward way than the GUI and removing potential errors.
The script: VM-Builder-T.ps1
Interactivity
This script is interactive which gives the user a feeling of control on what’s happening. I try to render my scripts interactive especially when I need to deliver them to other teams. The interactivy, I’ve placed in the script permits the user to ingest the data required for the deployment of the VM and check it before running the commands (You know, always better to check twice 🙂 !! )
Workflow
I think one of the best thing you can do when writing script is to document it by writing down the workflow. It will help you to validate the process and optimize it if needed. In other situations, it will help others to troubleshoot or prepare a new version of the script. As I like document my work (yes it happens !! 😉 ) and I want to render you confident to run it in your environment (if you wish). My best advice, before running it in prod, try to run it in a lab environment, just to be sure it will run as it should in your context… Even if the code is correct, the context can generate issues or failures (Welcome in IT 🙂 )
So you can find here under the workflow of this script:
script workflow
User input is represented by : yellow parallelogram
User decision is represented by pink diamond
Script action is represented by blue rectangle
The workflow can be divided in 5 steps
script steps explained
Error Handling
To ensure the good processing of the script I’ve tackled error handling in 3 ways:
Do…Until loop (permits the user to review and validate his input
Try…Catch (permits a clear understanding of a failure in case of a terminating error)
Out-Gridview -passThru (prevents typo error by presenting a window to the user by selecting data instead of typing it)
As explained here above, the Out-Gridview -passThru cmdlet will retreive the data from the vCenter instead of having the user of the script typing manually the name of the concerned object.
Here is an example of the code for determining on which ESXi host the VM will be initially placed
Out-gridView cmdlet explained
User Input
To be able to deploy a VM with PowerCLI, you, as a user of the script must have specific data in your hands. Here is the list of components you need before running the script
Mandatory input to ensure the good processing of the script
The data of each component will be stored in variables via the Out-Gridview -Passthru cmdlet
Prerequisites
As always, to be able to run the script, your environment /working machine must satisfy some requirements. Here is the list identified in the version 1.0 of the script
Prerequisites for running the script
Conclusion
This script is not a very complicated one but it permits a sysadmin to create easily a VM in a vSphere environment by eleminating potential human errors and vSphere GUI issues. I hope this post / script will help someone at least by getting ideas to complete his own script. As mentionned above, feel free to test and use it. As always, run it first in a lab envrionment if you want to use it as is.
It has been tested and validated in a vSphere 6.7 U3 environment. No bug or issue have been reported. The script is in version 1.0, some improvement will come soon. Feel free to check regulary on my github public repository. Don’t hesitate to rate this post as it permits me to have an idea of your degree of sastisfacation of the post. It’s always a source of improvements !! 🙂 🙂
PowerShell 7 has been introduced in March 2020. It is the second version of PowerShell that is open-source and cross-platform which means that it is available now on Mac OS and different distributions of Linux.
The main objective was to permit IT admins to manage heterogeneous environments and hybrid public Clouds.
In top of that, one of the key features of this version is that it can live side-by-side with your default installation of PowerShell (5.x) without interfering with it in any ways. The main reason behind that is that they run on different versions of .Net architecture. (.NET Framework 4.5 for the PowerShell 5.x and .NET Core 3.1 for PowerShell 7.x)
The following list reviews the new major features that come with PowerShell 7.0:
Installs and runs side-by-side with Windows PowerShell.
Improved compatibility with existing Windows PowerShell modules.
New language features, like ternary operators and ForEach-Object -Parallel.
Improved performance.
SSH-based remoting.
Cross-platform interoperability.
Support for Docker containers.
PowerShell 7.0 can be run on the following OS:
As a final point for this little introduction, here are the main points that confirm the 2 PowerShell instances can coexist on the same Windows machine:
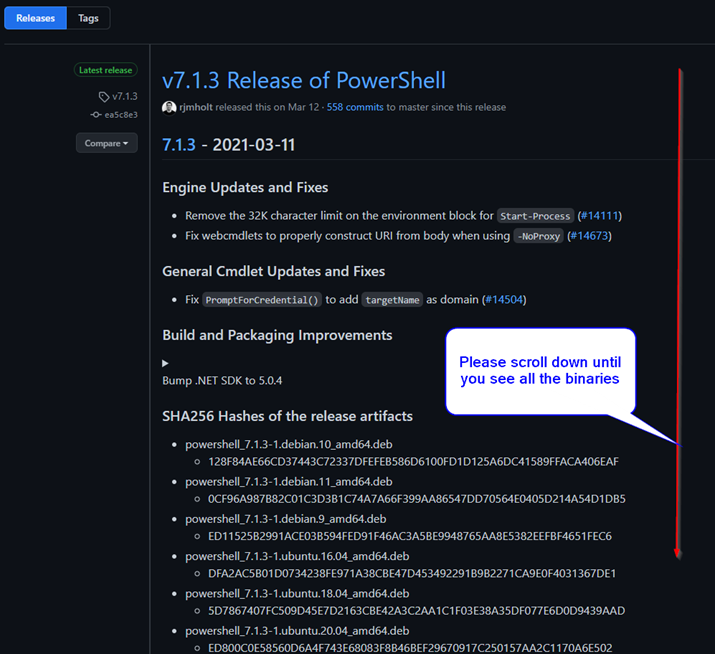
On that page you can see a detailed information about the release available for download
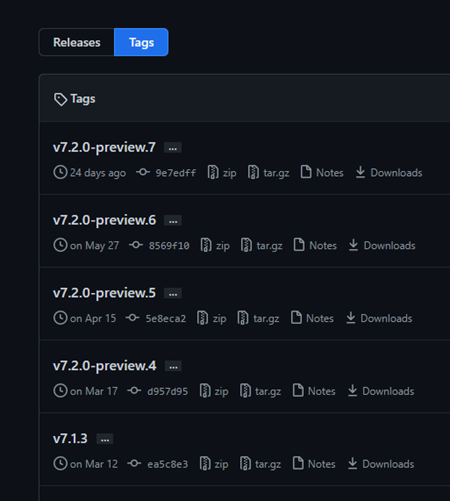
To focus on the available download options you have, click on “Tags” button.
It will return a view like the following one (typically a more concise list).
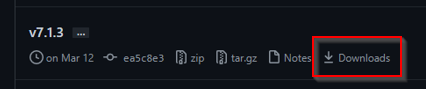
Select the version you want to deploy on your machine. I strongly recommend you to deploy only the versions which are not marked as preview if you’re working on a production environment.
Click on “Downloads” button as shown here under.
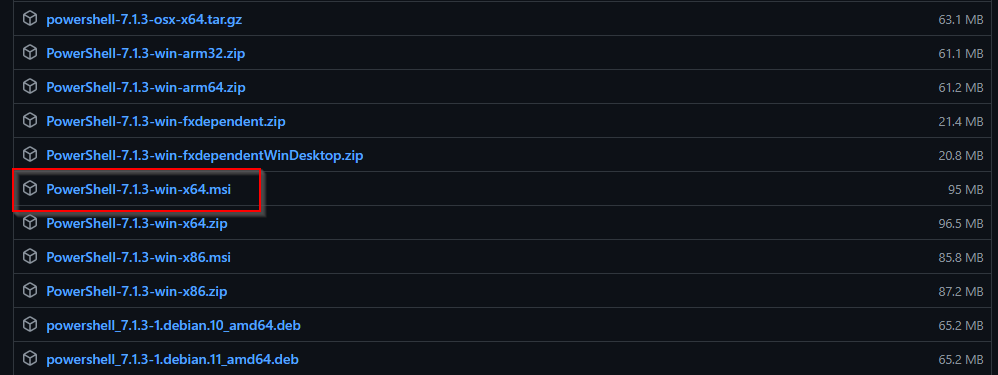
Then you will get the following page with all the binaries you want for that specific version
Click on the name of the binaries which correspond most with the platform you will use PowerShell on. (In my case, Windows 10 64-bit)
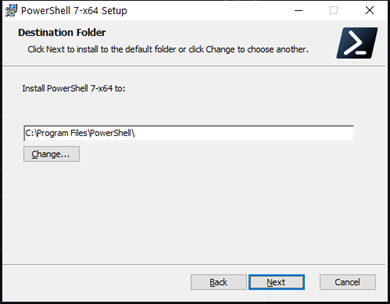
3. Install PowerShell 7:
Launch the downloaded file:
Configure the location of the file:
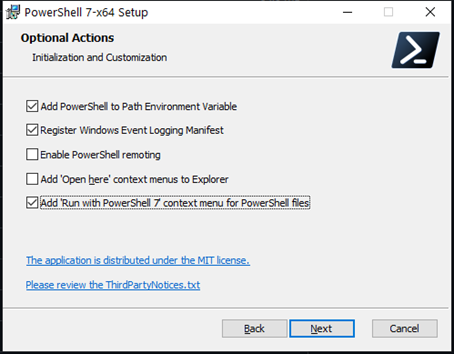
Configure Options as you want:
I’ve added the option: “Add ‘Run with PowerShell 7’ context menu for PowerShell files.
In my case, I have added this option to permit me to evaluate the differences of behavior of my scripts between versions.
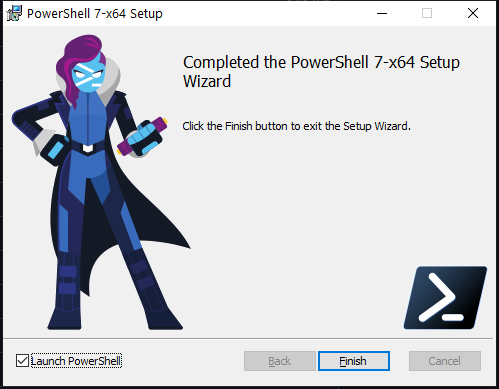
Run the installer:
If the installation is successful, you should be able to launch a PowerShell 7 console as shown here under:
4. Validation of the installation
The following screenshot confirms that I have 2 versions of PowerShell that can coexist on the same machine:
Now, have fun with the 2 versions!
I hope this post helped you, Dont’ hesitate to comment, like or rate, Your host,
I don’t know for you, but the following situation happened to me many times.
You work in a team where you exchange scripts. You write scripts for others or you receive scripts that you need to re-use as they did the job they were supposed to do. Sometimes, you need to update a script but the author is no more working in the company and so on…
It could be painful especially if you or another created functions in it, if you don’t understand why specific regions of the the code have been written in a certain way instead of a more functional way. As I’ve written in another post of this blog, the beauty of PowerShell is that you can achieve the same goal in dozen of ways. All are good but depend of the context when you wrote the script. By the way, you don’t need to have a script 500 lines with functions in it, to not understand all aspects of a script. It could become a problem especially as we are talking of automation.
So, the best way to help yourself (it works also in that way. I promise 😉 ) and help others to understand your script is to create a help section in it.
How? WTFM (Write The Fu*** Manual)
Let’s start the fun part, as you have now the context of the post 🙂
Phase 1: Comments
With PowerShell, you have the option to comment your commands in a script which permits to give the user an idea of what does a specific command.
# the following command will permit you to retreive the last 50 errors in System EventLog of the machine
Get-EventLog -LogName system -EntryType Error -Newest 50
For the newcomers, the syntaxt for inserting a comment in the code is to start a line with the hashtag symbol (#) (My prefered method for an easier reading). As an alternative, you can insert (#) at the end of a command as shown here under.
Get-EventLog -LogName system -EntryType Error -Newest 50 #command to retreive Last 50 System's event
A comment means that Powershell will never try to process the text behind (#).
These comments are good to help you remember specific points of your script or to help others to understand how you wrote your script but it’s limited:
You need to read the script via an Script Editor (Notepad++, Visual Studio Code, PowerShell ISE)
If you have a long script or a lot of points to mention, it could reduce the readability of a script
Difficult to reference everything
Complicated to give more context on how the script was built
PowerShell conceptors have thought about how to go to the next step and remove those limitations!
How?
Let’s talk about: Comment-based help
Phase 2: Comment-based Help
Here it is 🙂 !! Let’s WTFM
Sometimes, it helps you also when guys that running your scripts are coming back to you after a while and trying to improve the script. (It happened to me several times! 🙂 ). You don’t necessarilly remember everything about the decisions that motivate you to write the script in a specific way. That’s why I try, as often as I can, to create a “Comment-based Help” section
Indeed, the concept behind “Comment-based Help” is to create a comment block in PowerShell script where you detail everything you need to render the script (especially the way you wrote), totally understandable by anyone who use it. The beauty behind this is that it can be interpreted by PowerShell Help system and render it totally readable outside a script editor context.
Architecture
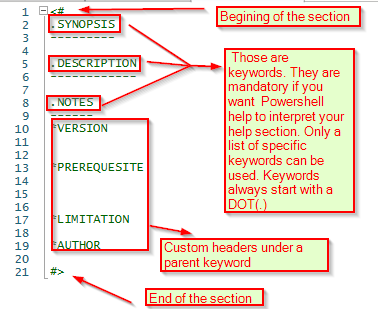
To be understood and interpreted by the Help system of PowerShell, you need to respect a specfic architecture inside this section. To help you undertand what I mean, here is an example of an empty “comment based help” section:
Blank “Comment based Help” in PowerShell ISE
Delimiters
The “comment-based help” is a section in your script. As it’s a section, it has delimiters that are represented as here under:
Opening the section: <# Closing the section: #>
This section can be placed at the beginning or at the end of the script. No matters!
Keywords
As mentionned in the picture above, keywords are the key components of your help section if you want PowerShell help to treat it correctly. Those keywords are limited to a specific list as detailed here under:
To get a better understanding of all those keywords and how to use them, I strongly advise you to read Microsoft Help via the following link: Microsft Online Help
As additional information regarding keywords, you need to know the following characteristics about them:
They are not case sensitive
The order you place them in the “comment-based help” section is not important
You don’t need all. It will be dependent of your script content
Now, you should have a better understanding on how to create help section in your scripts 🙂 The next step is to validate the functionality via a demo! 🙂
Demo time!
As I’m a VM admin, I’ve wrote a script and it’s located on my local machine. Before sending this script to my colleagues, I would like to check if my help section is working as it should.
I Open a Powershell session on machine and navigate to the directory where the script is stored
2. I run the following command to display the help of the script
Get-help .\xVcenter_vMotion_V1_0.ps1
3. PowerShell returns me the help section I’ve created in my script – Taaa-Daaa!!! 🙂
This is nice, but I have a prefered alternative to that command as it opens the help in a new independent window which prevents screen pollution in the PowerShell session. Here it is:
Get-help .\xVcenter_vMotion_V1_0.ps1 -ShowWindow
The result should give the following output:
Get-Help script in new window
The big advantages I see having the help in a seperate window are:
We have the option to search terms in the help section we’ve created
Via the “settings” button you have the option to hide or unhide keywords of the help section
This point concludes the point regarding “content-based help”
Conclusion
Running a script is an easy thing but be sure of the effects of the script on your environment and how it behaves globally can be challenging especially if you are not the author of the script. My own experience shown me multiple times that adding comments or help section in a script could be useful to everyone who runs it. That’s why since a while, my rule of thumb is to include a help section and comments in my scripts to be sure that others will be confident when running the script. Also if needed, they will propose more easily improvments as they have a clear understanding of the code.
So help yourself and others by creating “content-based help” which I consider the manual of your script and add comments to specific areas of the script to remove potential questions.
I hope this post helped you, Dont’ hesitate to comment, Your host,
We all know the situation where we are in front of our blue PowerShell console painted with red everywhere…. 😦 Just because you don’t really know the command and how you need to play with to get the result you expected!!!! The funiest moment…or maybe not(depening of what you typed) is when you type a command that worked, but the result is not what you expected. 🙂 🙂 🙂
When practicing PowerShell, the best advice I can give is: help yourself with a lab environment. That one doesn’t need to be a monster. 2VMs will be enough. If you don’t have the luck to setup your own lab environment, play with PS on a machine (can be your own first) and do only read actions in the first place… As a last resort, you can use a cheat…!!! You will need to continue the read to know it 🙂 🙂
Read commands ?? Yeah! Remember what I said in my earlier post (check the link at the beginning of this post).
Your interactions with objects in Powershell can be split 4 main categories. Those categories can be grouped in 2 groups (Active & Passive) with their associated risks.
To get a better understanding or a better view of what I say, let’s take a look at the following table:
Actions Categories
Group
Risk
Create
Active
Potential
Modify
Active
Potential
Delete
Active
High
Read
Passive
None*
Actions categories overview
So based on that information, we can continue with the main topic of the post which is about commands or more specifically cmdlets that will facilitate your journey with PowerShell.
Here is the list of cmdlets that we will talk about in the next sections of the post:
Get-Command
Show-Command
-whatif (parameter)
cmdlets
Get-Command
Get-command is probably one of the top command that you need to know with Powerhsell as it will reveals you all the commands known by powershell and its related modules.
Before continuing with Get-command cmdlet, I will do a very quick introduction about PowerShell modules. You will understand why very quickly! I promise!
A PS module is just an extension of the core components of PowerShell which introduce a whole set of cmdlets and functions. For instance: let say that you want to manage an EMC storage array with PowerShell. Natively PS is not able to do it, but with its related module installed on your machine, you will be able to manage your storage array with PS. Most of the time, modules are cmdlets and functions written by 3rd party providers outside Microsoft ecosystem, to let engineers and admins manage their products with tools they are familiar (Yes, for you too! 🙂 )
Now, that you know what a PS module is, let’s continue with the cmdlet Get-command. So, simply typing Get-command in your PS console without any parameters will return you on screen all commands available in PS and its related modules (you see! I told you it would be quick!!)
You will get someting like this:
Get-command extract
The main problem is that it will return you thousands of cmdlets. Even if know the information you look for, it could be painfull to retreive the extact data you expect.
So my advice: Create your own cheatsheet with all your commands in it via Get-command cmdlet and keep it with you.
Copy-Paste the following command to create a csv file in your “C:\temp” with the required information
For the formatting of the result, I let you deal with MS Excel or your other favorite tool for tables.
Don’t hesitate to do it reguralry based on the modules you’ve installed over time and PowerShell updates.
You’ve seen on the command that I’ve selected only 4 properties. For my own use, those ones are the most interesting, feel free to change the properties you want to see.
If you wondering which propreties you have in the panel, use the following command:
Get-Command | Get-Member -MemberType Properties
Last but not least, regarding Get-command, if you don’t want to deal with a csv file on your side, you can always do a search based on the name of the object you want to deal with.
For instance: You need to work on a disk with Powershell but you have no idea about the available commands for disk. You can type the following command to get a better view:
Get-Command -Name *disk*
This will return you all commands where “disk” is included in the name of the cmdlet.
This conclude Get-command section. hope it will help
Show-Command
show-command can be viewed as a second line of help when you didn’t find your path with the built-in help of PowerShell.
The syntax (vey simple BTW 🙂 )
Show-command followed by a space character and finally the command for which you need help
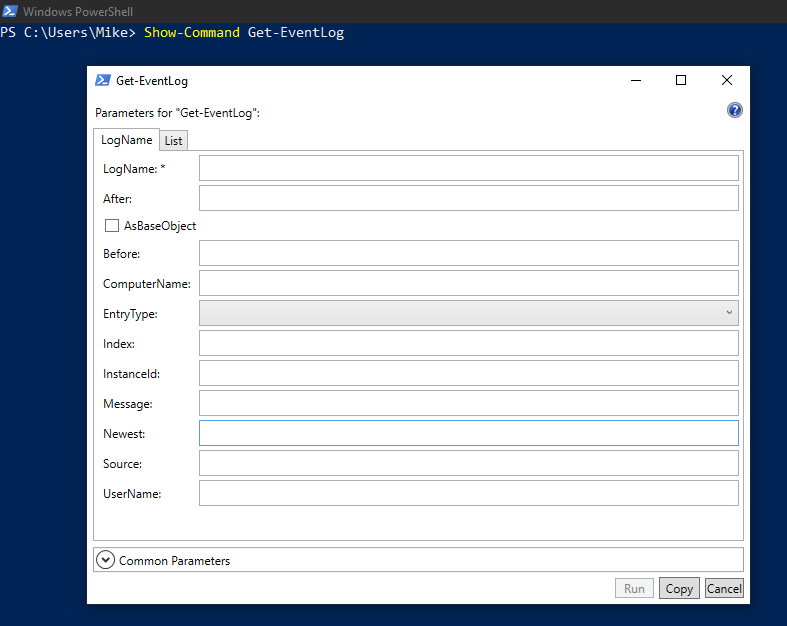
show-command Get-Eventlog
This command will pop-up a window (GUI yes!!! GUI ) that will guide you throught the basic syntaxt of the command. Mainly by helping you with the parameters.
Let’s take an example:
You want to get the last 50 eventlogs from system context on your machine, but you want to see only “Error” messages. Unfortunately you don’t know how to do it with PowerShell . The help about the command didn’t help you enough.
Type the command in your PowerShell console
show-command explained – step 1
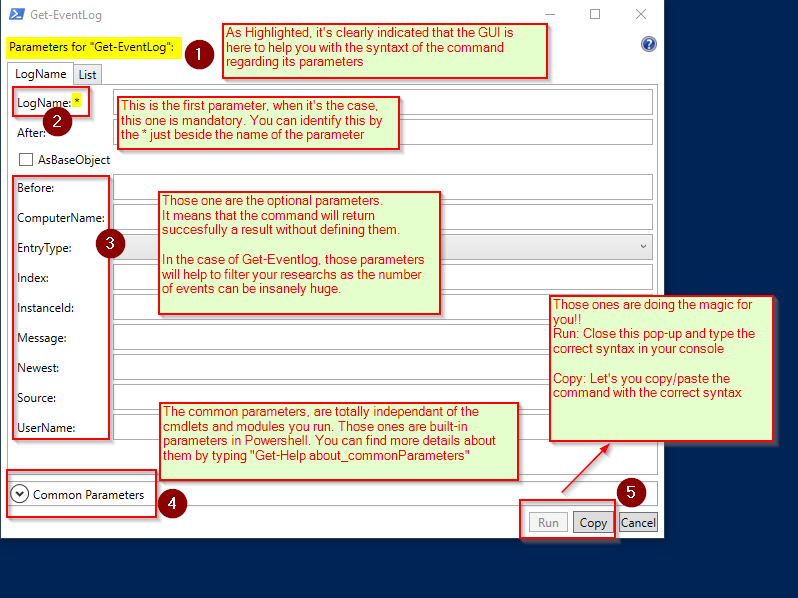
2. A Pop-up appears
show-command explained – step 2
3. When you have a closer look at the pop-up, you can see the following. I added annotions to give more explanations.
show-command explained (Intermediate step)
4. Fill the parameters boxes as described in the beginning of the example
show-command explained – step 3
5. Click on “Run” button to get the command directly typed with the correct syntax in your PS console (don’t forget to remove “^M” at the end of the command if it appears)
show-command explained – step 4
And Boom! the magic happens! 🙂
show-command explained – demonstration
Which concludes the show-command topic
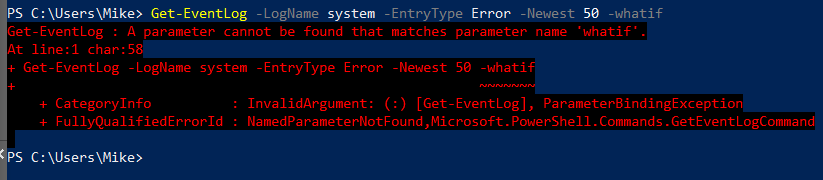
-whatif parameter
Bingo! Here is our cheat one! 🙂 you remember at the begining of the post? This one is a very cool feature, especially when you don’t have any other options (lab environment) to test your command in PowerShell.
A key concept you need to know with -whatif parameter is that, it is only available for commands that will modify the objects you’re working on! It will simulate the actions taken by the command only.
Don’t try to add -whatif parameter where the verb of the cmdlet is Get (typically read), it won’t work 😦
whatif explained 1
Here is an example on how to use it
whaif explained 2
You can see, as show in the screenshot that the -whatif parameter will simulate the action without performing it.
For your fun only 🙂
New-Alias -Name Whattime -Value Get-Date -Description "need to know when I can grab my coffee" -WhatIf
Last word before finishing this post
A last parameter that is also nice to use is: -confirm parameter which is also available on commands that will modify objects in PS. This one won’t simulate, it will take action after receiving your confirmation
It means that you know what will be the result of the actions taken. It’s only a validation. This is the main difference with -whatif
Conclusion
To help yourself, run this cmdlets and parameters as frequently as you can. They will help you and they will save you time and energy.
Thanks for reading! Don’t hesitate to leave a comment or rate this post. It will help for the future posts.
The objective of this post is to give you the key elements to permit you finding your path dealing with Powershell espcially if you are a new comer.
Target audience ( Yes I need to specify 🙂 ):
This article is not for people with advanced powershell skills (sorry guys 😉 ) as I try to help beginers to jump on the “Powershell train”. But don’t hesitate to read and comment, always room for improvments
Powershell is a fantastic tool but as all programming language it has its own rules based on syntax and interoperabilities with different components.
In the IT community some people will tell you that PS is not a programming language others will tell you the opposite. My little background in studying VB pushes me in the second group.
I let you decide if yes or not it’s a programming language! Enjoy the lecture and the learning
Rules of thumb: Objects, Objects and Objects!! :-)
PS is an object oriented language. It means that you will manipulate or get informations about objects. An object can be a NIC card, a VM, a storage array setting, even a .csv file.
With powershell you can split your interactions with objects in 4 main categories:
Modify
Create
Delete
Read
wait a second! 🙂 I told you earlier (Powershell Introduction) that you can do a multitude of things with Powershell and now I say only 4 things.
Let’s take a step back! PS is an object oriented language, what do you need more when dealing with objects? If you still have some doubts, let’s take the example of a file: What do you want to do with a file? Euuhh,… Modify, create, delete and read. Bingo! Here it is!
Now, the beauty of powershell is that you have a multitude of ways to accomplish the same thing and you can play on a multitude of objects at the same time.
Still not convinced, here is an example about the options you have for getting the same information about a specific disk on a machine:
In this example, I wanted to get the name of my disk number 6 on my machine. You can see that I’ve wrote 2 lines to get the same result
Long way
Short way
Result: The same in both cases: “Kingston DataTraveler 3.0”
Before discussing more about commands and because we’re talking of objects in Powershell, here is a list of objects that are interesting when you learn Powershell. It’s not exaustive at all, but I need to restrict myself for this post. If you want to see more about Powershell objects, I strongly advise you to read about_topics in help (help will be detailed later in this post)
Objects
Description
Aliases
An alias is a nickname for a specific cmdlet. You can create your owns
Variables
A variable is an object that you store in memory to be re-used later in a script or in an advanced command by PS
Functions
A function is a command or a script for which you assign a name. The function can have parameters as commands
PSProviders
PSProviders are objects that render visible data that is residing outside Powershell (instance / session)
Modules
A module is an extension of Powershell which contains its own cmdlets, functions, help files. Most of the time, it is developped by 3rd parties, like Amazon, HP, VMware… This way it extend the PS footprint.
Powershell Commands
Of course! Commands! 🙂 As you need to interact with objects, you need commands to accomplish the magic!
Powershell commands can be categorized as follow:
cmdlets -> is the native command-line utility that is only present in Powershell ecosystem. It is written in the .NET Framework
functions -> You can see a function as a group of cmdlets. Typically a script that is written in PS scripting language.
Applications -> An application is a command understood by powershell but which is coming from outside Powershell framework (for instance a command coming from your regular Windows command-prompt such as ping, telnet, diskpart…
Understanding the cmdlet mechanism and syntax
The best way to explain the syntax is an example. So here under you will find a powershell command that illustrates all its components.
Powershell-Command explained
The cmdlet itself (1 & 2 on the picture) is always composed of a verb and noun seperated by a dash sign (-). No space in between Typically action on object.
A parameter (3, 5 on the picture) is always preceded by a dash sign (-). When needed, you can or must add a value (4 & 6 on the picture) to this parameter. You always put a space between a parameter and its associated value Typically it is how you do the action on a object
A switch parameter (7 on the picture) can be added at the end of the command but is not linked directly to it and is not mandatory as well (it really depends of the cmdlet you use).
With powershell nothing is case-sensitive!!! Thanks to the creators of Powershell.
If you’re interested to get more info about Powershell syntax you can run the following command: Get-Help about_Command_Syntax
Cool stuff about commands in Powershell
Autocomplete
A very cool feature that unix guys know for a while but was not present for Windows guys is “autocomplete”. Whatever your experience with powershell and because you cannot recall every single command syntaxt, you can use the auto-complete feature to help you. Start typing Get- in you powershell console and type on TAB key of your keyboard to receive suggestions from powershell. This feature will help you a lot.
Commands history
Another very cool feature with Powershell is the command history. Again, unix guys know this for while which was not the case for Windows guys. With Windows Command prompt when you close and re-open it again, you are not able to retreive your commands you typed before, which could be frustrating especially when you spent hours to make a command working (complex of course 🙂 🙂 🙂 How the magic happens with history? Simply because of the presence of a file located in your machine as shown here under:
For those who want to get the path ready for their own checks, here is the path: C:\Users\%username%\AppData\Roaming\Microsoft\Windows\PowerShell\PSReadline
!! Attention!!! it’s only valid if you have at least Powershell V5 on your machine. You can quickly verify by running the following command in Powershell console: Get-host
You should obtain a result like this:
Be aware that this file stores 4096 commands by default. which means that each time the limit is reached, it overwrites the file. You can play with the size of the file by changing a Powershell variable
$MaximumHistoryCount
I’m not going to go in the details for that as it’s not the objective of this post, maybe it could be a topic for a more detailed post about that
Powershell Help
For this one, I can really dedicate a full post, maybe I will do it. For the good handling of this post I will give you the bird’s eye view on this.
All the IT pros using Powershell will tell you that the best thing you can do to help yourself in your PS journey is the constent usage and good understanding of PS help. Whatever you write a script or executing a simple command, PS help is always there to help you 🙂 Even with 6 years of experience dealing with PS, we still use PS help.
Microsoft identifies 2 categories of help files. It identify them as follow: 1. Help files for cmdlets ( syntaxt example: Get-Help Get-eventlog) 2. Help files for concepts (Get-Help about_profiles)
Get-Help comes with a set of built-in parameters that will help you differently regarding which piece of the puzzle you miss. Here is a list of parameters (not exaustive) that you can find with Get-Help cmdlet:
Get-Help Get-Eventlog -detailed
Get-Help Get-Eventlog -full
Get-Help Get-Eventlog -examples
Get-Help Get-Eventlog -online
I let you try on your own to identify the differences between all of them! But I promise, you will notice differences 😉
Updating help
As the rest of your computer, you need to update the help content of Powershell. Why? simply because it will help you to receive the most accurate information regarding a command or concept. Sometimes, errors are reported, a new command is available and you don’t have help information for that. After using it for some time you will see that this cmdlet will be one of your best friend.
Note! to update your help files, you need to run the following cmdlet Update-Help in a elevated session (Administrator session)
If you do it in a regular session, it will fail as you alter the system. Depending on the environment you work, you may not be able to run a PS session in Adminisrator mode, probably due to security policies put in place in your company. Refer to them to help you in updating your Help files.
Powershell Session
A powershell session is the instance of Powershell you run locally, remotely or via API. To complement this short description, here is a picture that is illustrating easily the concept of session
Not all Powershell objects live across different sessions. Variables are the perfect example of this. For instance, I can create a viariable in a local session (Powershell console interacting with local computer), create a variable and close this session. Next, I reopen a session, type the same variable. Result Powershell doesn’t know anymore.
As demonstration is always better, here are the screenshots 🙂
Session 1:
Powershell variable across session 1
Session 2:
Powershell variable across session 2
Why? What’s happening under the hood?
The answer is quite evident when you have a closer look at the annotations in the screenshots.
Powershell is an executable, and because of that, each Powershell session run in its own memory pages. This means that the information is not shared between sessions.
Powershell Session – Memory usage
When the session is closed all related objects present in the memory pages are cleared from memory (RAM).
Statement: All objects (variables, functions, aliases…) created by a user have a lifetime equivalent to the one of the PS session.
This natural behavior is quite ennoying when you want to reuse the same objects over sessions. That’s why the creators of Powershell wanted to help and render your work more comfortable 🙂 🙂
They created: Powershell profiles which is detailed in the following section of the post
As a last note: Powershell system objects are persitent across sessions.
Powershell Profile
Last (component) but not least for this post! 🙂
Powershell profile is powershell script that is located in a specific place on your drive. You can configure everything you need for your different PS sessions (variables, functions, modules…)
Each time you launch Powershell, it will load all the objects you configured in the Powershell profile file. So depending of what you configured in that script, the Powershell session will take more or less time to start.
Prerequisite:
To be able to run a powershell profile you need to configure Powershell to run script via the following cmdlet.
Set-ExecutionPolicy
Please check the help if you are not sure how to use it via: Get-Help Set-ExcutionPolicy as it could expose your computer to security risks.
If you have a computer managed by an IT team within your company, maybe the best option is to check with them what is the best approach for your needs.
For my homelab environment, here is the full command I type. Security in this case is not a concern: Set-ExecutionPolicy -Scope LocalMachine -ExecutionPolicy Unrestricted As this one removes any security checks, I would recommend you to execute that one in a isolated lab environment only. Depending of your environment, you will need to modify the syntaxt.
In Powershell, you need to know that you have 6 Powershell profile files. Here is the table which details locations and purposes
Description
Path
Current User, Current Host (local machine/console)
I hope this post helped you to get a better understanding of PowerShell basics. I hope, at least, it gaves you the envy to learn or practice it. Today as IT admin, working on servers or computers without knowing how to automate tasks, is a real break in your career so don’t hesitate to jump in and practice powershell.
I hope this post helped you, Dont’ hesitate to comment, like or rate, Your host,
In this post I will explain quickly how to install VMware Tools package inside your Windows 2016 Core server VM.
The main point to keep in mind with Windows 2016 Core is that, as the GUI feature is not available, not all installers will work with this version. You need to check with vendor if the software you want to install is compatible with 2016 Core
Regarding VMware, the VM tools installer is fully compatible with the core version of Windows
The procedure:
Note: The procedure here considers that you already mount the VMware tools ISO on your VM via the VMware vSphere Client or VMware workstation GUI.
1)Log on to the guest OS
2) Check that the VMware Tools ISO is mounted to the guest OS by running the Powershell command: Get-volume
3)Identify the drive letter of your Virtual DVD drive (typically the ISO mounted by VMware vSphere Client or VMware Workstation)
4)Navigate to the drive letter of your Virtual DVD (in our case d: ) by typing d: at the prompt
5) Launch the installer by typing the following command in the prompt .\setup.exe and wait for the installer to run as shown in the following screenshot
6) Install the VMware Tools depending on your needs (Typical, Complete, Custom) as shown here under and wait for the installation to finish.
7) At then end of the installation, reboot the VM by selecting yes as detailed in the screenshot here under
8) Check the VMware tools service is running by typing the following command at the prompt: get-service -Name VMTools
You should get the following result …. Ta-Da!!! Enjoy 🙂 🙂
I hope this post helped you, Dont’ hesitate to comment, like or rate, Your host,
Nowadays, who in IT didn’t heard about Powershell and more specifically Windows Powershell? I think we can say not so much people. Powershell evolved incredibly this last decade to the extend that now it is available on Linux and on MAC machines… and plenty of manufacturers as Dell, HP, and many others have developped their own modules for Windows Powershell to help IT admins in the daily administration of their products. it’s quite amazing!
Now, with Powershell and its modules developped my Microsoft and many other vendors and IT admin can tackle a massive amount of work with one core technology
Background
The following table gives you an overview of the release dates of the different version of Powershell and their avail abilities in the different editions of Windows.
Powershell version
Release date
Default Operating System
Windows Powershell 1.0
2006
Windows XP SP2, Windows 2003 SP1 and Vista
Windows Powershell 2.0
2009
Windows 7 and 2008 R2
Windows Powershell 3.0
2012
Windows 8 and 2012
Windows Powershell 4.0
2013
Windows 8.1 and 2012 R2
Windows Powershell 5.0
2016
Windows 10 and 2016
Windows Powershell 5.1
2016
Windows 10 and 2016
Powershell Core 6.0
2018
Windows 10 and 2019, Linux and MacOS
Powershell Core 6.1
2018
Windows 10 and 2019, Linux and MacOS
Powershell Core 6.2
2019
Windows 10 and 2019, Linux and MacOS
Architecture of Windows Powershell
Windows Powershell is a component of the WMF (Windows Management Framework).
WMF? what’s that guy? 🙂
Based on Microsoft definition:
Windows Management Framework (WMF) provides a consistent management interface for Windows. WMF provides a seamless way to manage various versions of Windows client and Windows Server. WMF installer packages contain updates to management functionality and are available for older versions of Windows
Each version of WMF is composed of the following components.
Windows PowerShell
Windows PowerShell Desired State Configuration (DSC)
Windows PowerShell Integrated Script Environment (ISE)
Windows Remote Management (WinRM)
Windows Management Instrumentation (WMI)
Windows PowerShell Web Services (Management OData IIS Extension)
Software Inventory Logging (SIL)
Server Manager CIM Provider
To summarize WMF:
WMF, is a core component of windows based on .Net framework which permits to manage OSes in the same way whatever the version. It is composed of the components listed right above.
WMF is included in each version of Windows whatever it is a server or client OS. Here is a table explaining the availability of WMF based on the OS version:
Windows Server 2019
Ships in-box
Windows Server 2016
Ships in-box
Windows 10
Ships in-box
Ships in-box
Windows Server 2012 R2
Yes
Yes
Ships in-box
Windows 8.1
Yes
Yes
Ships in-box
Windows Server 2012
Yes
Yes
Yes
Ships in-box
Windows 8 (Out of support)
Ships in-box
Windows Server 2008 R2 SP1
Yes
Yes
Yes
Yes
Ships in-box
Windows 7 SP1
Yes
Yes
Yes
Yes
Ships in-box
Windows Server 2008 SP2
Yes
Yes
Windows Vista (Out of support)
Yes
Windows Server 2003 (Out of support)
Yes
Windows XP (Out of support)
Yes
Yes
Why Powershell?
The main goal of Powershell was to permits IT admins to automate long and repetitive taks but not only that. If you compare the time you need to click on different elements of the GUI and the time you need to run a command-line to accomplish the same thing. The CLI command wins.
What is Powershell?
As introduced here above, Powershell is a Command-Line (CLI) utility which permits to configure, report, analyze, a single or a multitude of servers and computers at the same time.